- The Tell Tale Heart
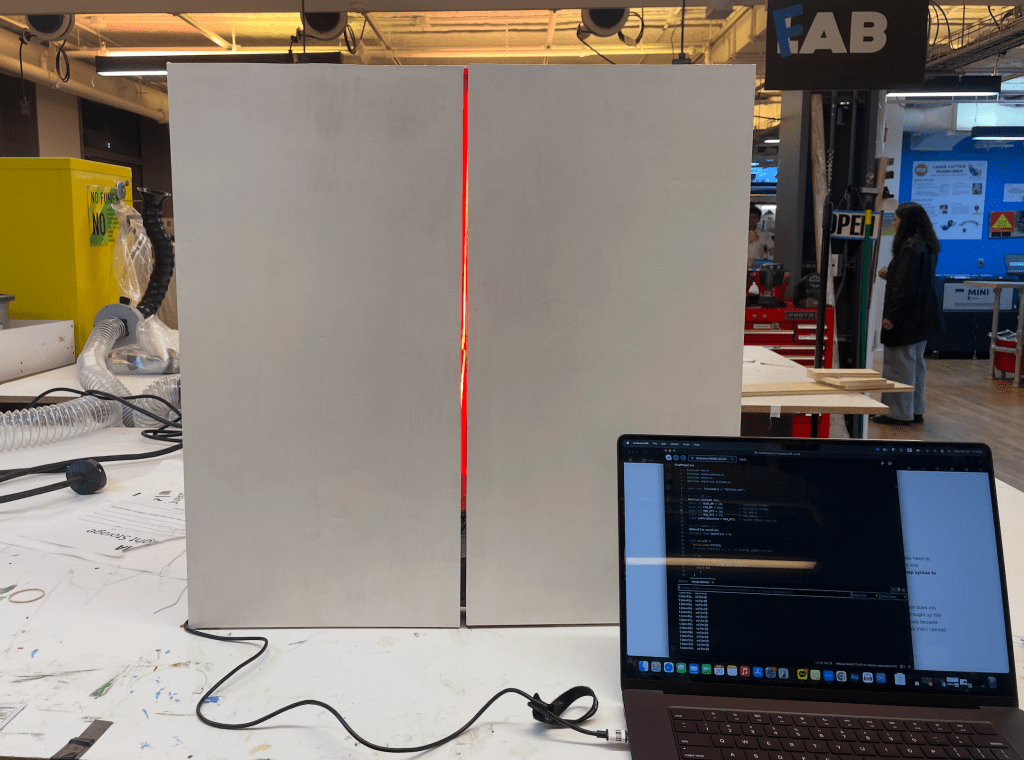
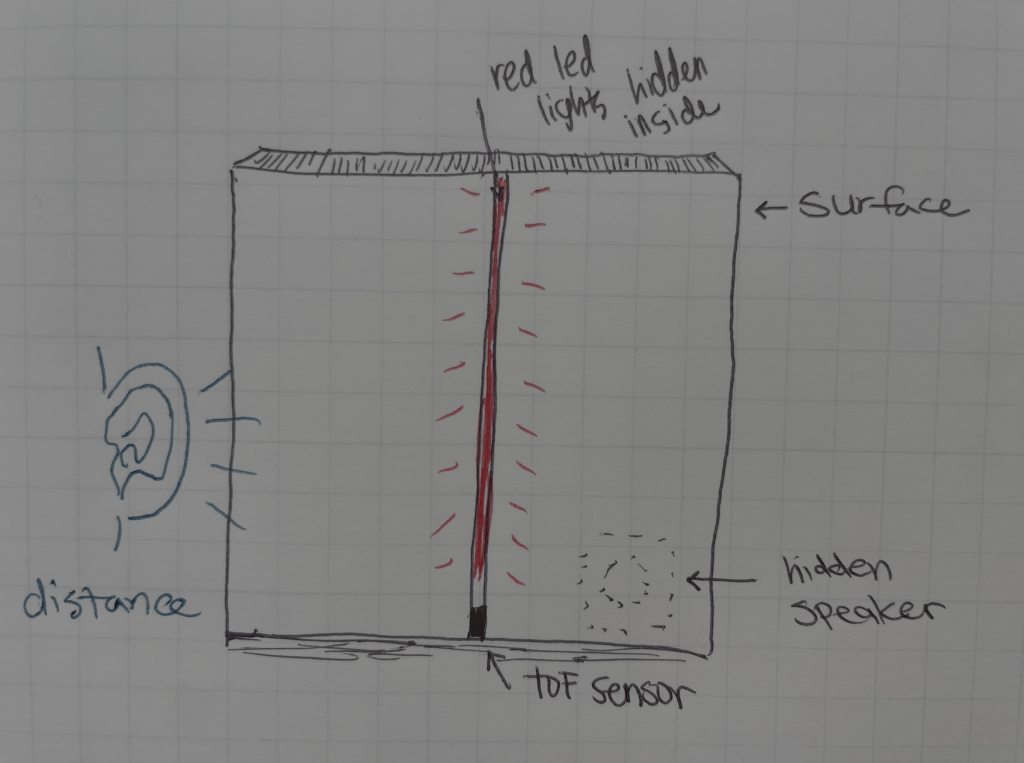
This is a distance detecting sound sculpture. I’m going to put a sculpture with speaker mounted inside. Also, I’m thinking of making a tiny hole or thin slits on the center of this sculpture with led light inside so people get engaged to get closer. At first, the ear seems silent, or emits only the faintest trace of a whisper. As the viewer approaches, the sound gradually becomes clearer (but still whispering), until they must place themselves very close to the ear to hear the secret fully.
Edgar Ellen Poe’s The Tell-Tale Heart reminds me of secret hidden underneath the surface. The closer you get, the louder it becomes.
- List of Component
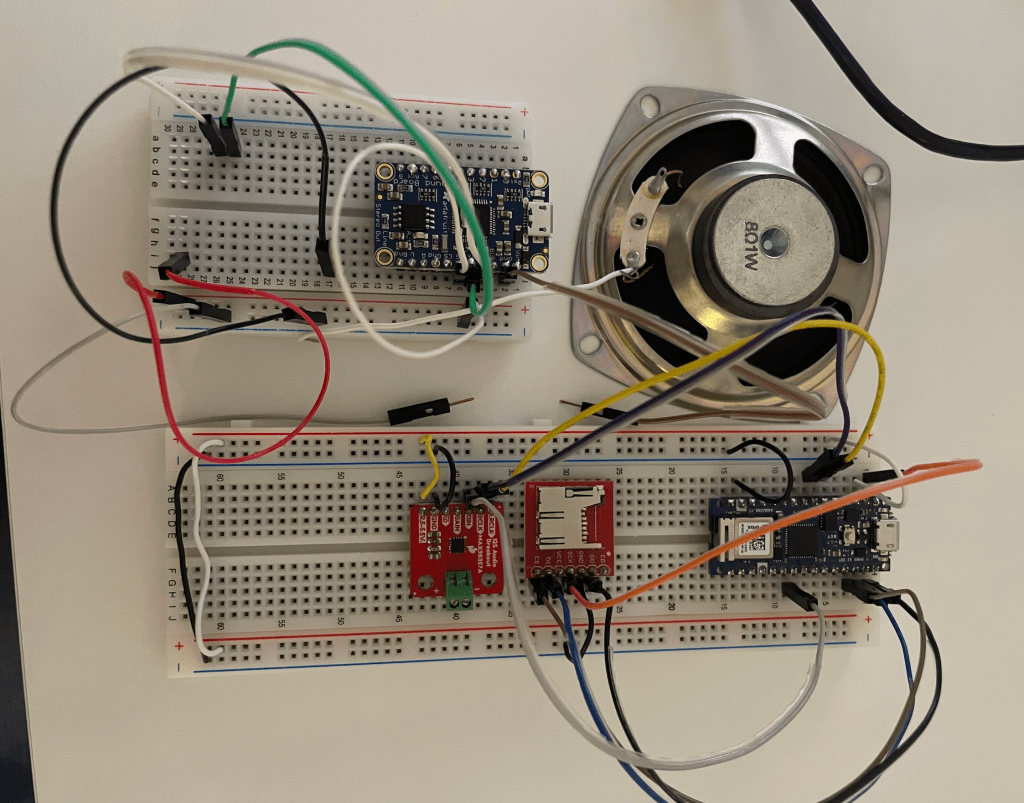
- Tof distance sensor
- I2S audio breakout
- SD reader breakout
- Mini Audio FX Board circuit
- Circuit and Code
Oct 11
reference: https://itp.nyu.edu/physcomp/lab-playing-wav-files-from-an-arduino/
To start with this project, I followed the wav file lab from Pcomp website. I dowloaded the ArduinoSound example and opened ‘WavePlayBack.’
CS(SD card detect) is connected to D10pin and DO(SPI data out) at D12pin.
First of all, reset the SD card to FAT format to make it validate to SD reader breakout. I put one .wav file on the SD card to test, but it kept printing out an “invalid” message. Since I was using a 64GB SD card, I think that might be the reason for the error. I’m going to use 32GB instead.

#include <SD.h>
#include <ArduinoSound.h>
// filename of wave file to play
const char filename[] = "PLAY.WAV";
// variable representing the Wave File
SDWaveFile waveFile;
void setup() {
// Open serial communications and wait for port to open:
Serial.begin(9600);
while (!Serial) {
; // wait for serial port to connect. Needed for native USB port only
}
// setup the SD card, depending on your shield of breakout board
// you may need to pass a pin number in begin for SS
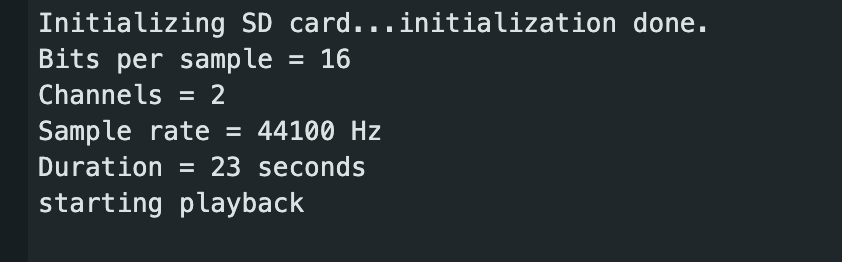
Serial.print("Initializing SD card...");
if (!SD.begin(10)) {
Serial.println("initialization failed!");
return;
}
Serial.println("initialization done.");
// create a SDWaveFile
waveFile = SDWaveFile(filename);
// check if the WaveFile is valid
if (!waveFile) {
Serial.println("wave file is invalid!");
while (1); // do nothing
}
// print out some info. about the wave file
Serial.print("Bits per sample = ");
Serial.println(waveFile.bitsPerSample());
long channels = waveFile.channels();
Serial.print("Channels = ");
Serial.println(channels);
long sampleRate = waveFile.sampleRate();
Serial.print("Sample rate = ");
Serial.print(sampleRate);
Serial.println(" Hz");
long duration = waveFile.duration();
Serial.print("Duration = ");
Serial.print(duration);
Serial.println(" seconds");
// adjust the playback volume
AudioOutI2S.volume(5);
// check if the I2S output can play the wave file
if (!AudioOutI2S.canPlay(waveFile)) {
Serial.println("unable to play wave file using I2S!");
while (1); // do nothing
}
// start playback
Serial.println("starting playback");
AudioOutI2S.play(waveFile);
}
void loop() {
// check if playback is still going on
if (!AudioOutI2S.isPlaying()) {
// playback has stopped
Serial.println("playback stopped");
while (1); // do nothing
}
}This is a code to check the file name in my SD card:
#include <SPI.h>
#include <SD.h>
const int SD_CS = 10;

void setup() {
  Serial.begin(115200);
  while(!Serial) {}
  if(!SD.begin(SD_CS)){ Serial.println("SD FAIL"); while(1); }
  Serial.println("SD OK. Root list:");
  File root = SD.open("/");
  File f;
  while((f = root.openNextFile())) {
    Serial.println(f.name());
    f.close();
  }
}
void loop(){}
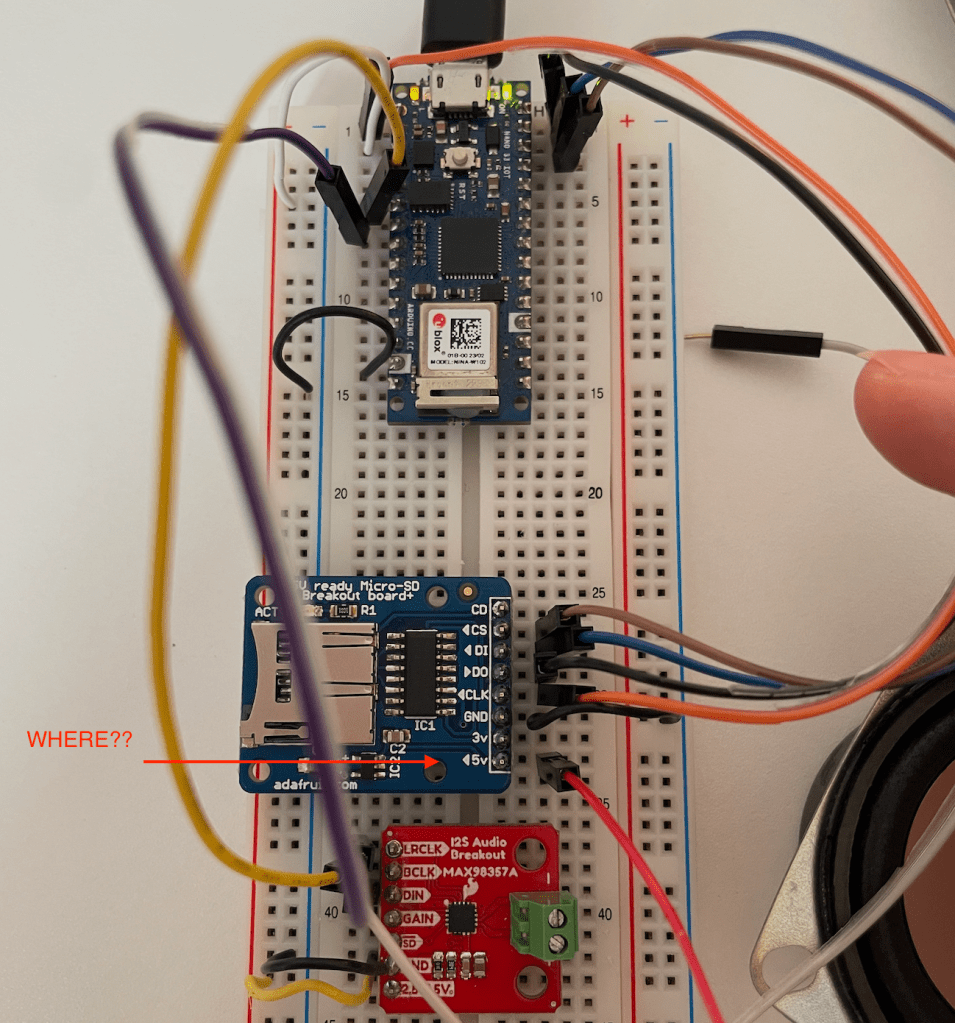
Q: For additional interest, I tried to use 5V SD breakout board, but what should I do with 5V pin? Since Arduino nano33 is 3.3V, I’m not really sure where I should plug in this voltage to run. Should I use DC adaptor instead?
Oct 13
I had continuous problem of invalid wave file issue. Then, after I exported the audio file through Audacity, it finally recognized the wave file and reacted.
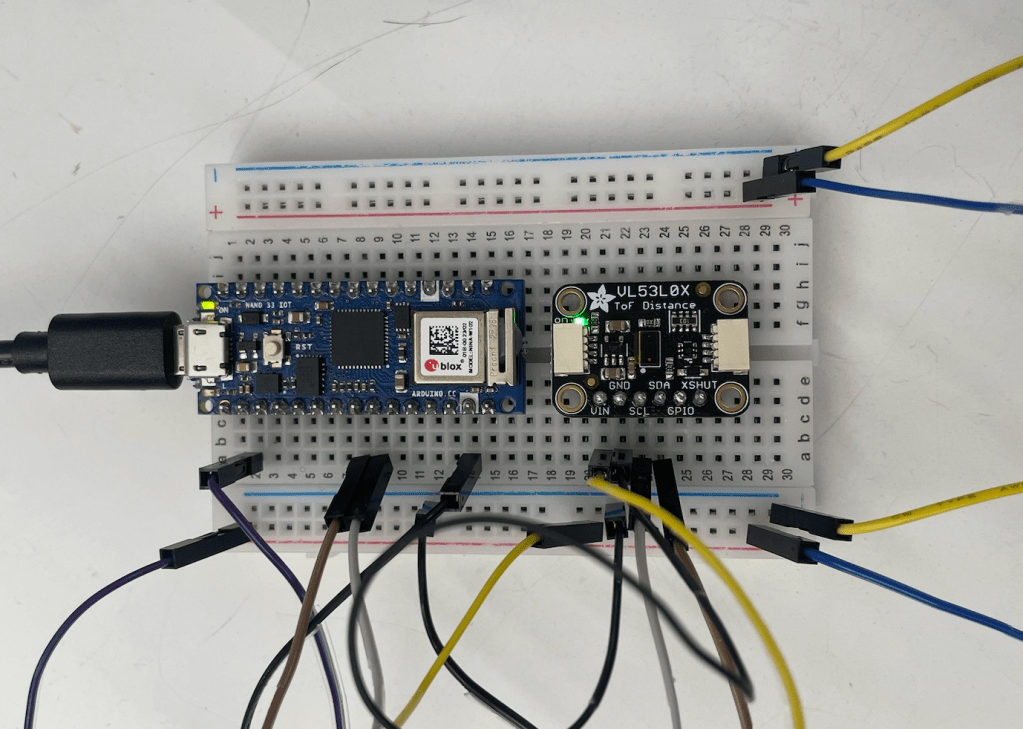
I tested ToF sensor and the range seems relevant to my project (reference)
Oct 16

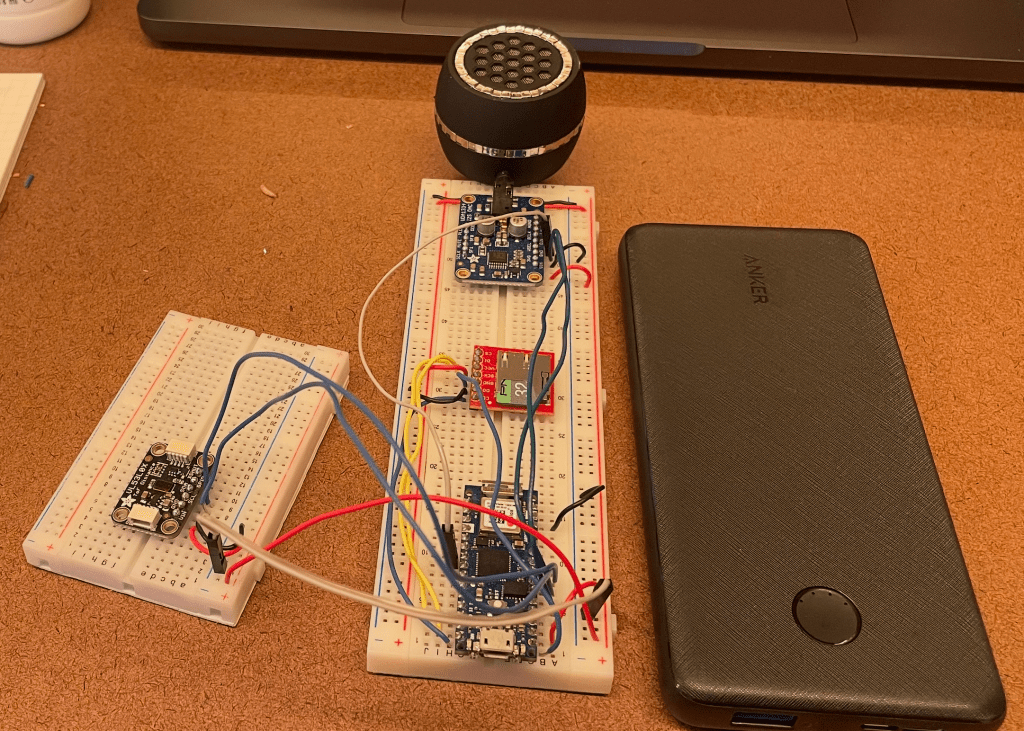
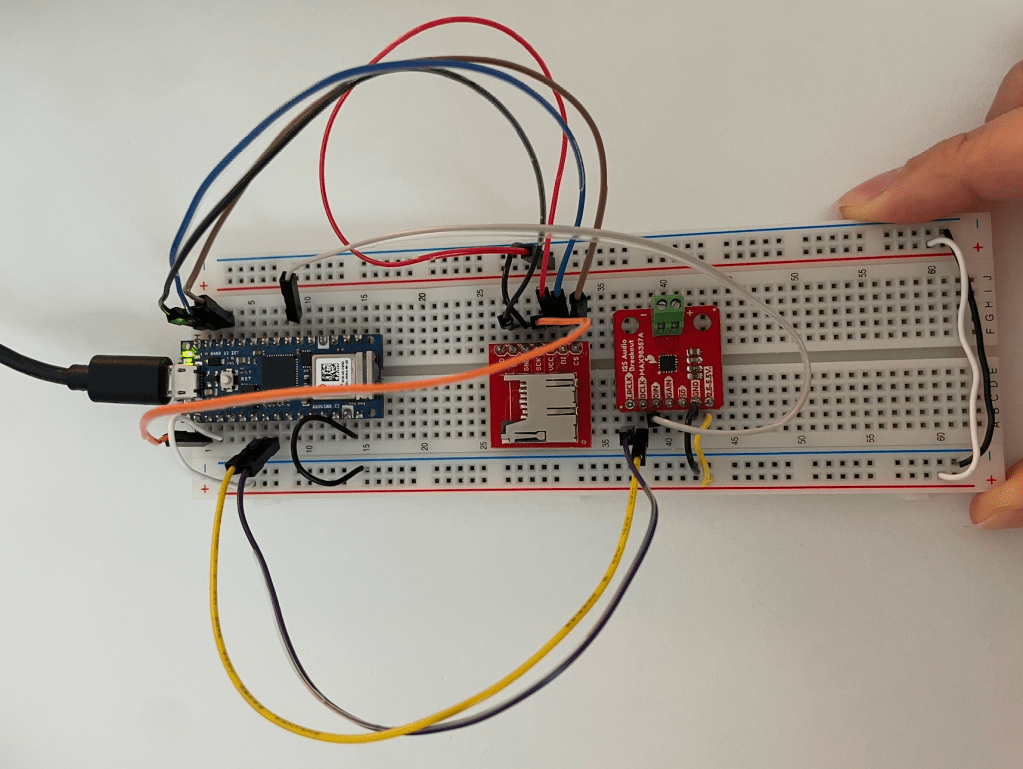
After several test out, I figured out I2S DAC is working. Since I2S audio breakout was so confusing, I decided to work on DAC instead and connect it to the speaker with audio jack. This is a final circuit pin.
SD card breakout
DO –
UDA1334 (I2S DAC)
VIN – (+) / GND – (-) / WSEL – A2 (6) / DIN – D4(9) / BCLK – A3 (7)
VL53L0X (time of flight)
VIN – (+) / GND – (-) / SCL – A5(9) / SDA -A4(8)
I checked whether each of the components working by separate codes. I also need to figure out if it is possible to change the volume through the DAC component and combining these two components in one code. I’m sure that I should use map syntax to indicate the maximum and minimum range of distance and volume.
Oct 17
I have several draft trials of code which never worked. Since DAC component does not have volume changing code itself, it was quite hard to figure out. Firstly, I started with code just to know how to change the volume. Then, since I already that the code set up for ToF sensor, I started to combine those two together. I brought up the libraries to run these components. Since I’ve read several references, my code became messy and it was confusing to keep the right libraries. This is a final libraries that I needed to run this circuit.
#include <SD.h> //SD card
#include <ArduinoSound.h> //I2S DAC audio
#include <Wire.h> //ToF
#include <Adafruit_VL53L0X.h> //ToF
At first I started with this code (wrong code to start).
Adafruit_VL53L0X lox;

File wavFile;
float gain = 1.0; // volume
const char filename[] = "PLAY.WAV";
“Adafruit_VL53L0X lox;” this line is needed to bring range and make argument to the ToF. “lox” is one of the built-in instance of ToF (like Class in javascript). Then, I defined wave file and bring out the specific file that I needed to play. Also, I found that to manage the volume, I need to use float() function to give smooth change throughout the range.
This code didn’t work well, so asked chatGPT to organize the line again and this is a clear codes to define the features in my project. I call the sound file first and then set the range in the ToF: distance and volume. Then, define the files and time.
const char filename[] = "PLAY.WAV";
// ---- ToF ----
Adafruit_VL53L0X lox;
const int NEAR_MM = 50; // Close(<max)
const int FAR_MM = 600; // Far(>min)
const int MIN_PCT = 10; // Min volume(%)
const int MAX_PCT = 60; // Max volume(%)
float volPctSmoothed = MAX_PCT; // Smooth transition
// ---- Audio ----
SDWaveFile waveFile;
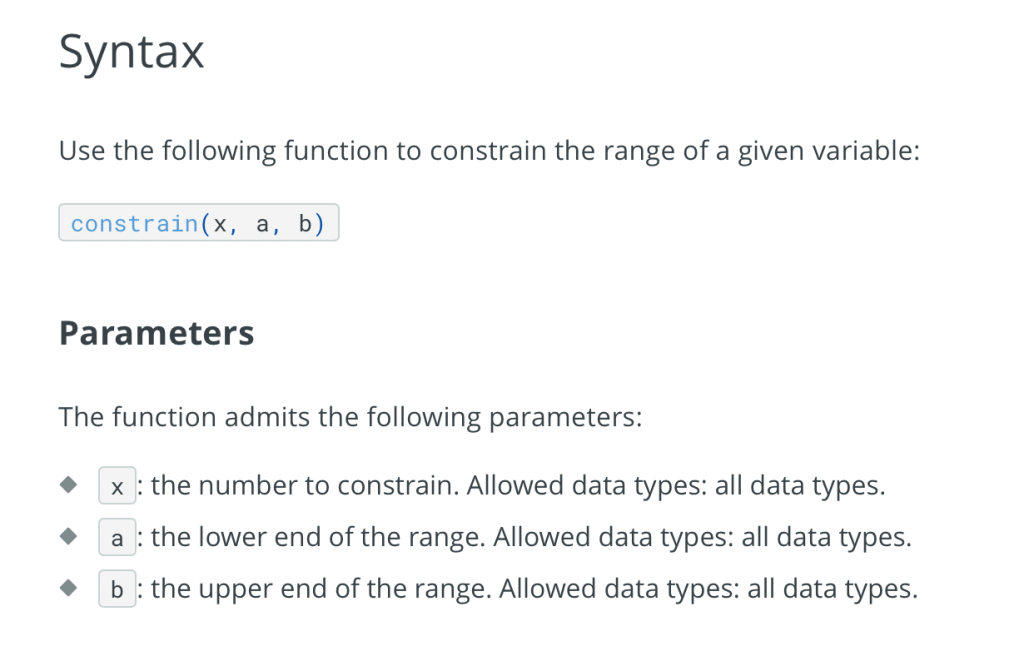
unsigned long lastPrint = 0;I went to professor Rios’s office hours to have better understanding of this code. ‘unit16_t’ is just like ‘int.’ Then I used constrain function so if the sensor accidentally reads something too low or too high, this function forces the value to stay between the minimum and maximum range I define.
void loop() {
  // ---- distance reading ----
  if (lox.isRangeComplete()) {
    uint16_t d = lox.readRangeResult();
    d = constrain((int)d, NEAR_MM, FAR_MM);

    // volume up when approach:  NEAR→MAX_PCT, FAR→MIN_PCT
    int targetPct = map(d, NEAR_MM, FAR_MM, MAX_PCT, MIN_PCT);

    // smoothing
    volPctSmoothed = 0.85f * volPctSmoothed + 0.15f * targetPct;

    // ArduinoSound volume 0~255
    int vol255 = (int)(constrain(volPctSmoothed, 0, 100) * 255.0f / 100.0f);
    AudioOutI2S.volume(vol255);
}- Fabrication
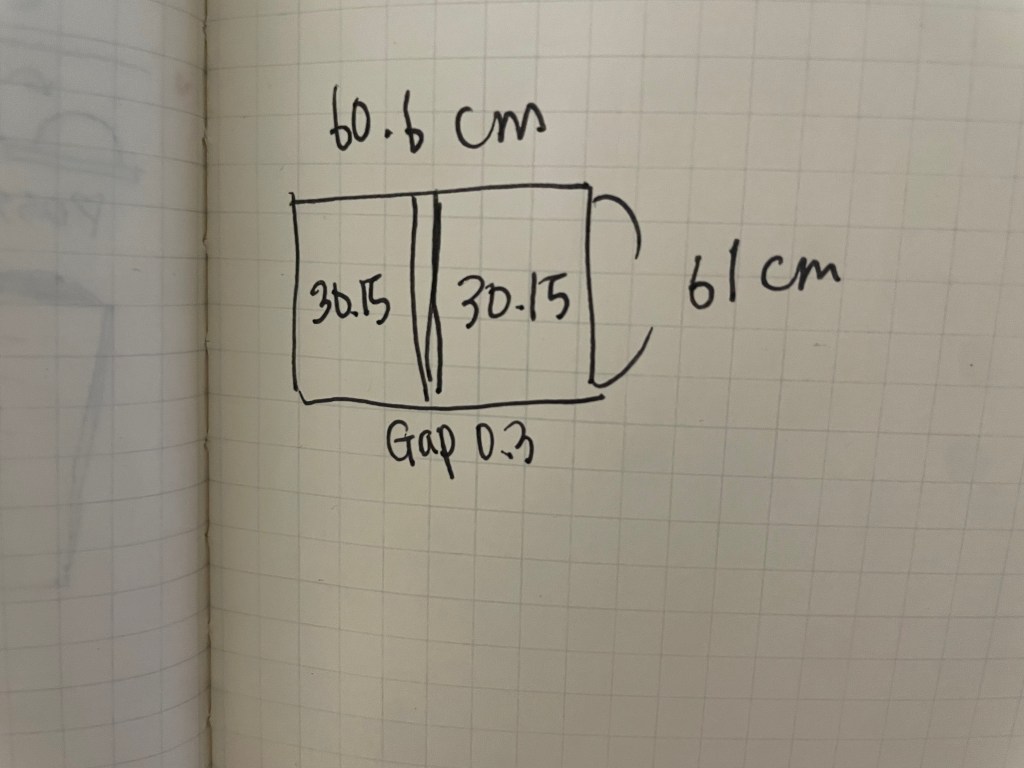
I measured the width of pillar in the classroom which was around 70cm. I wanted this installation to look like a wall, I followed the measurement and ended up with 60x61cm.

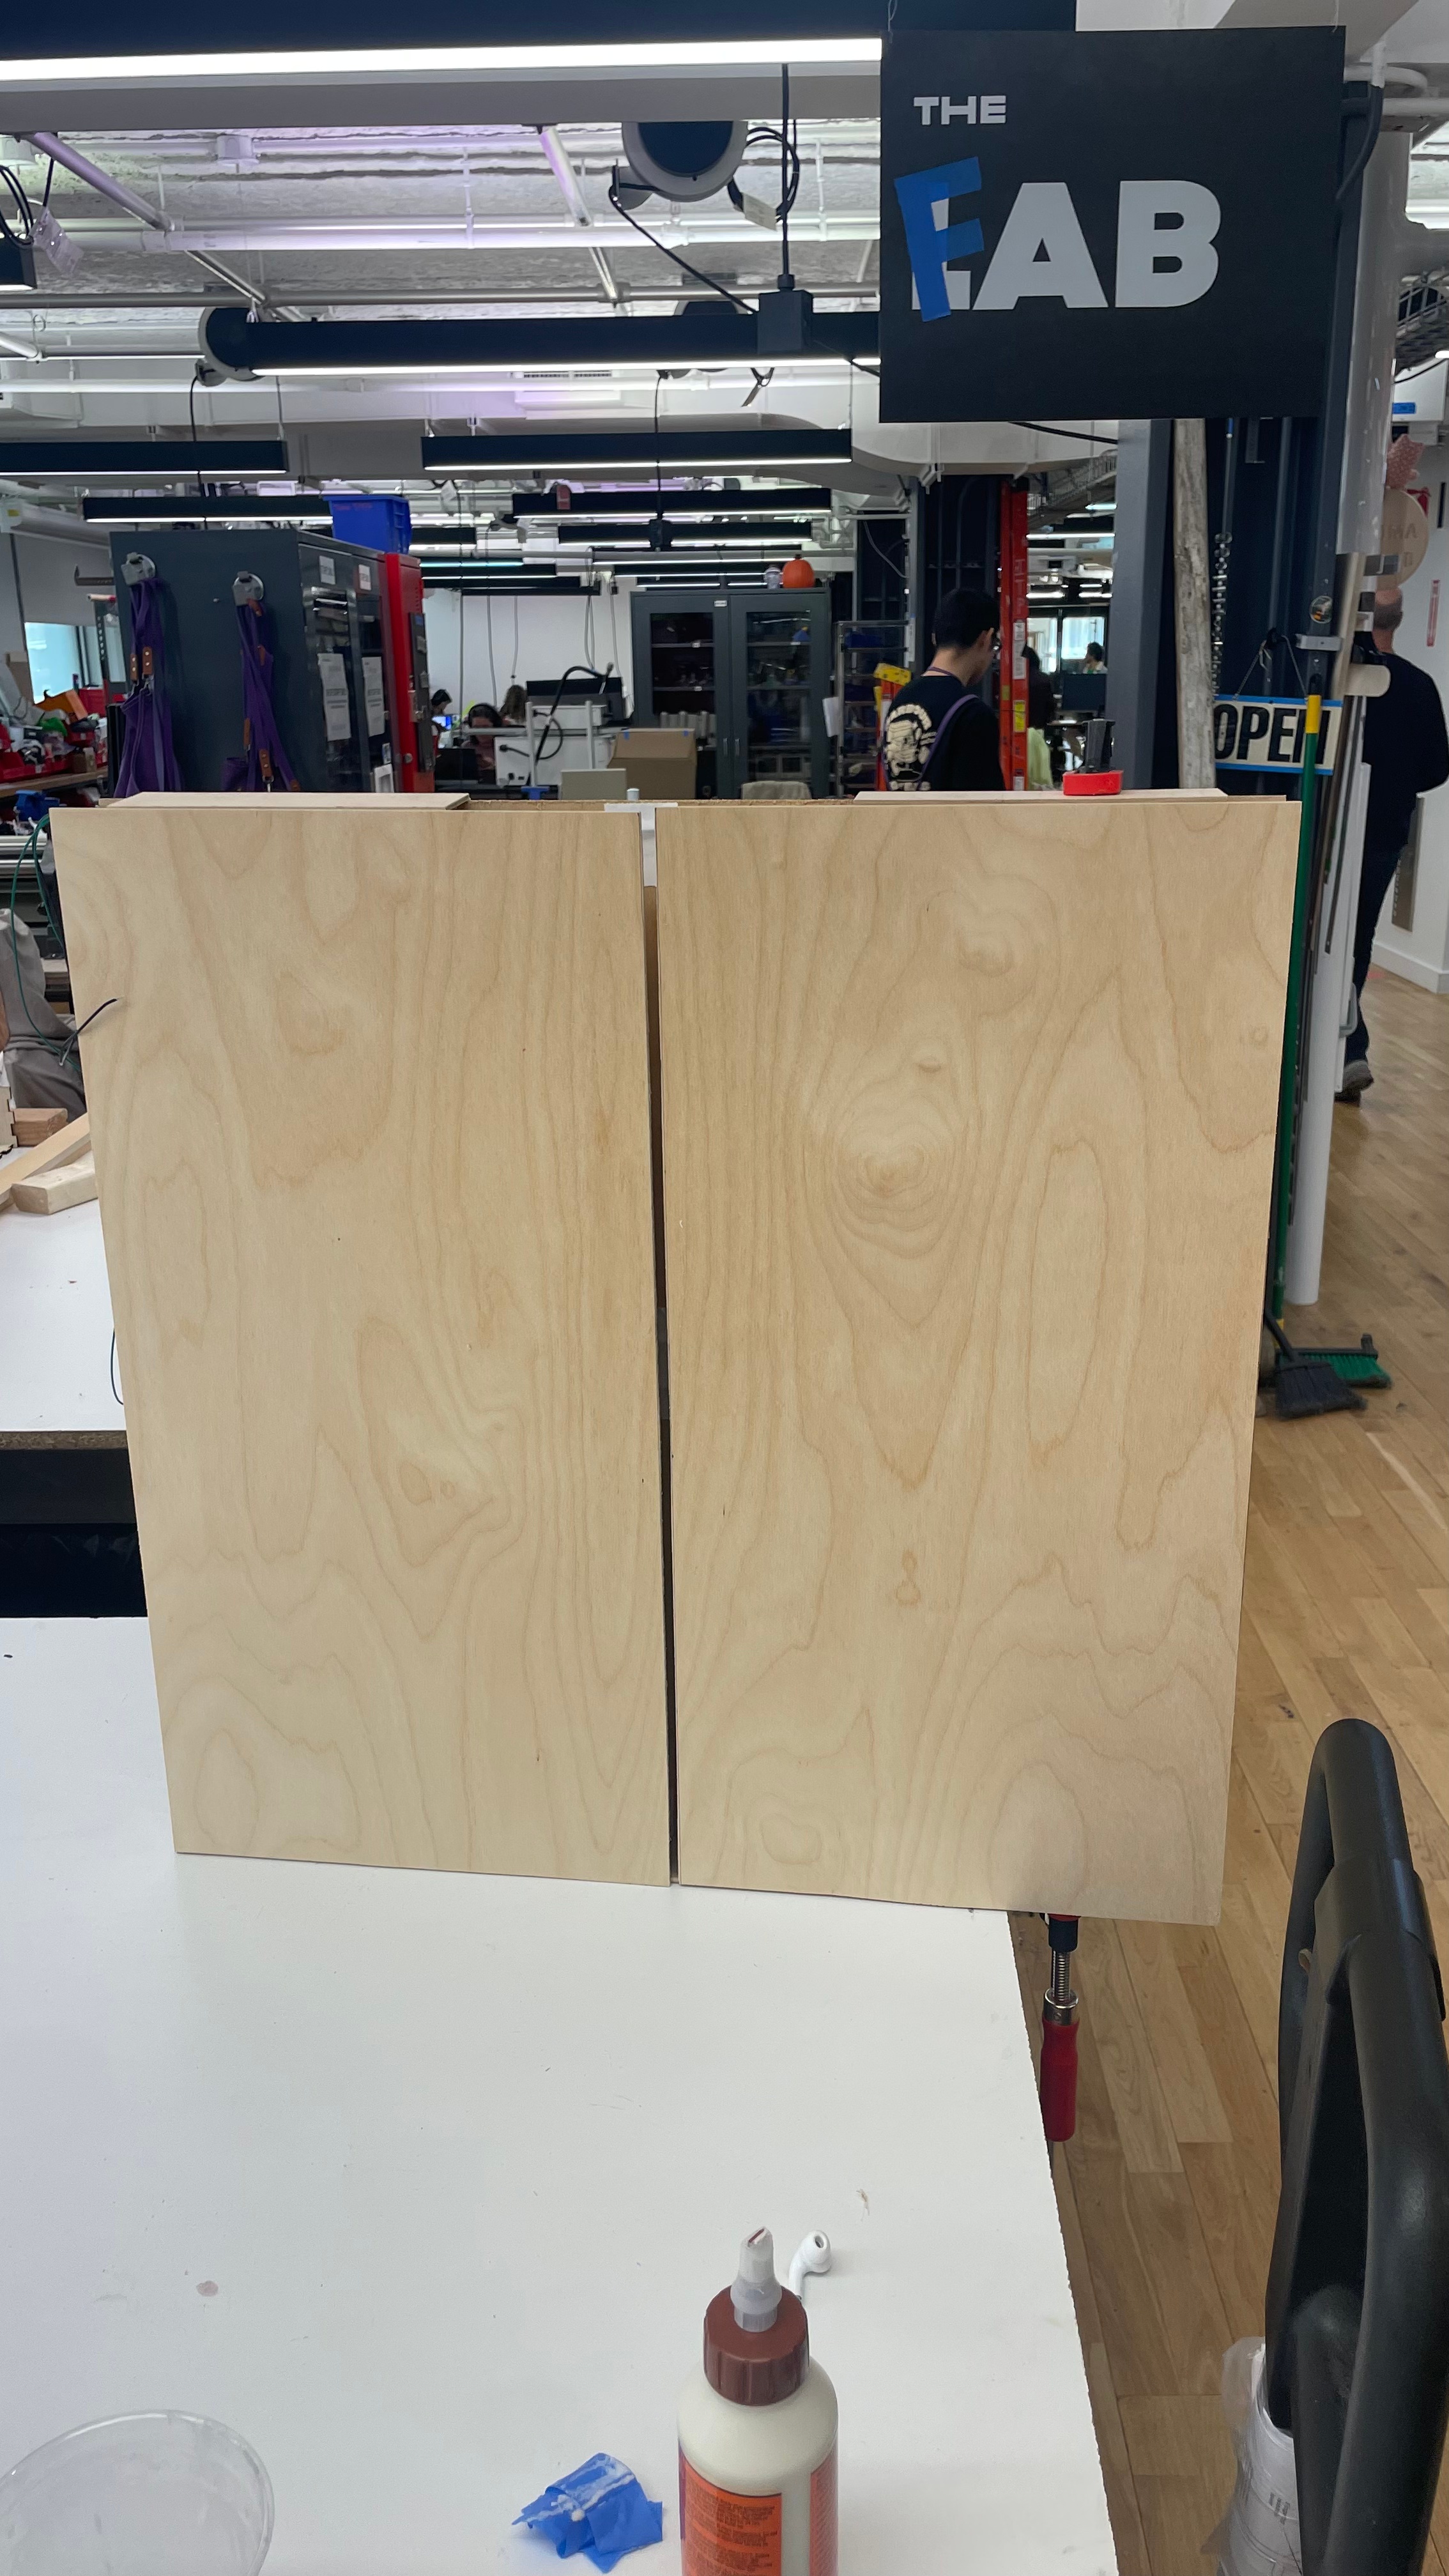
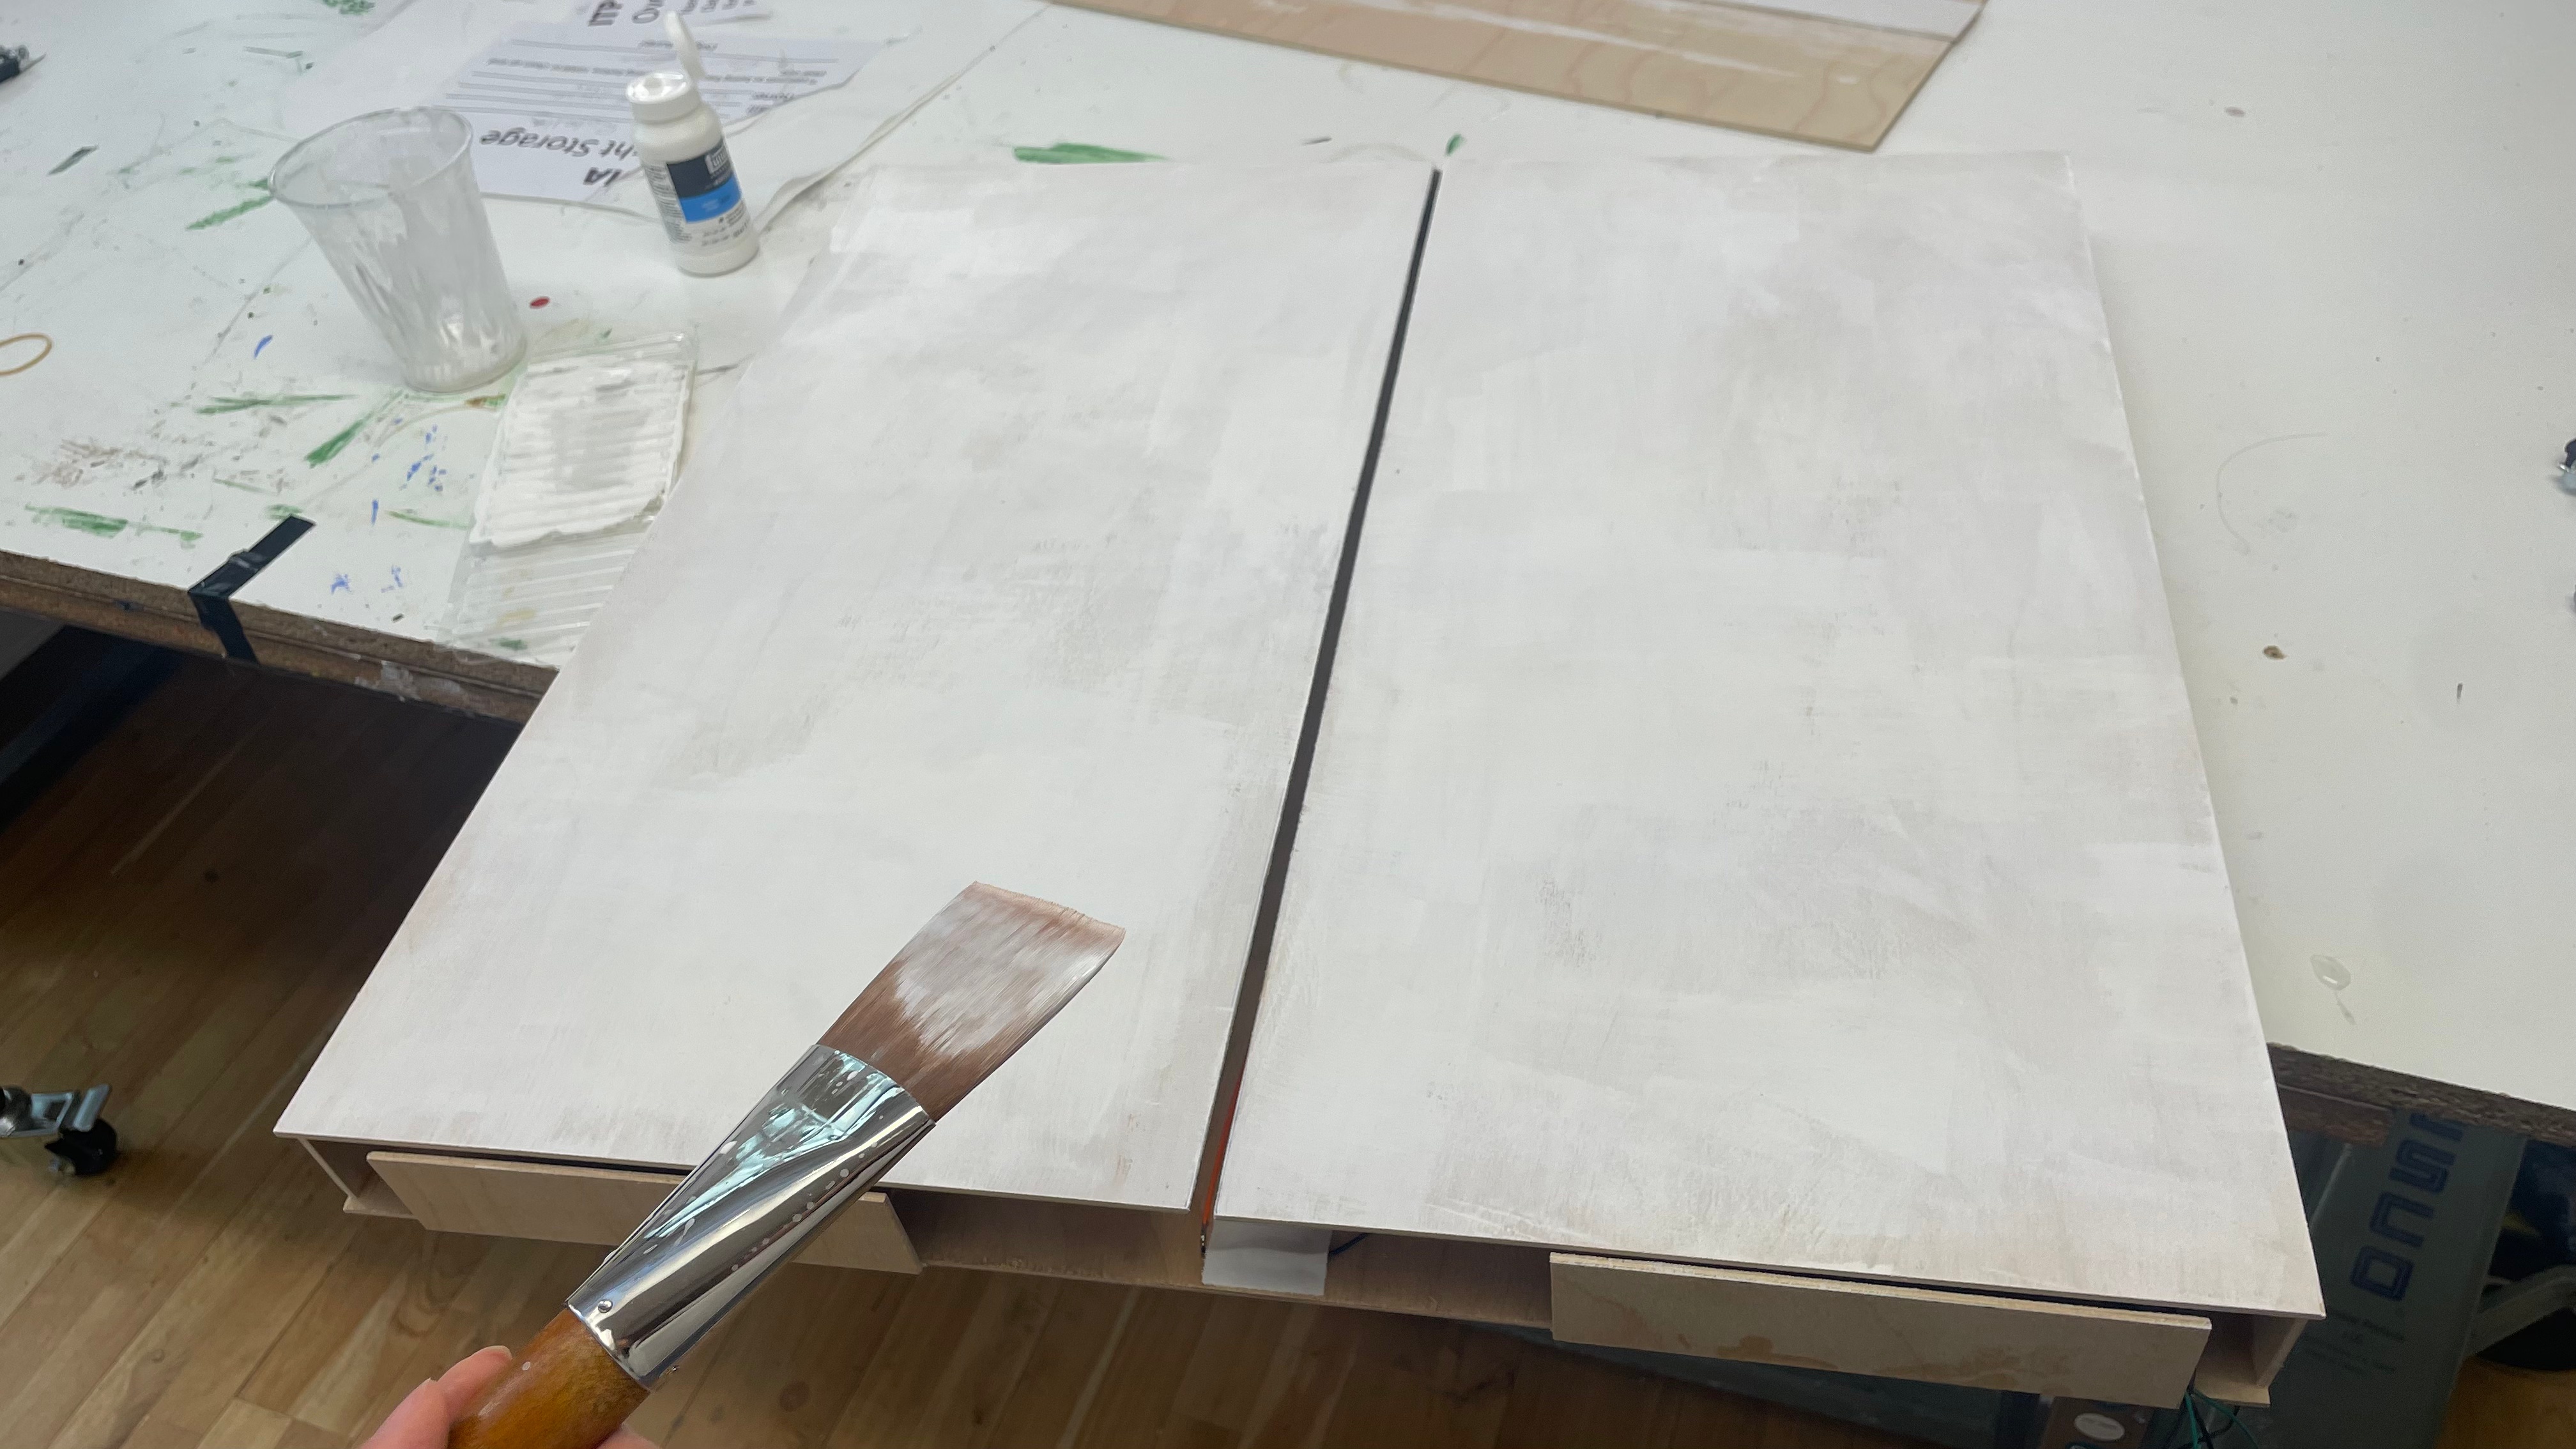
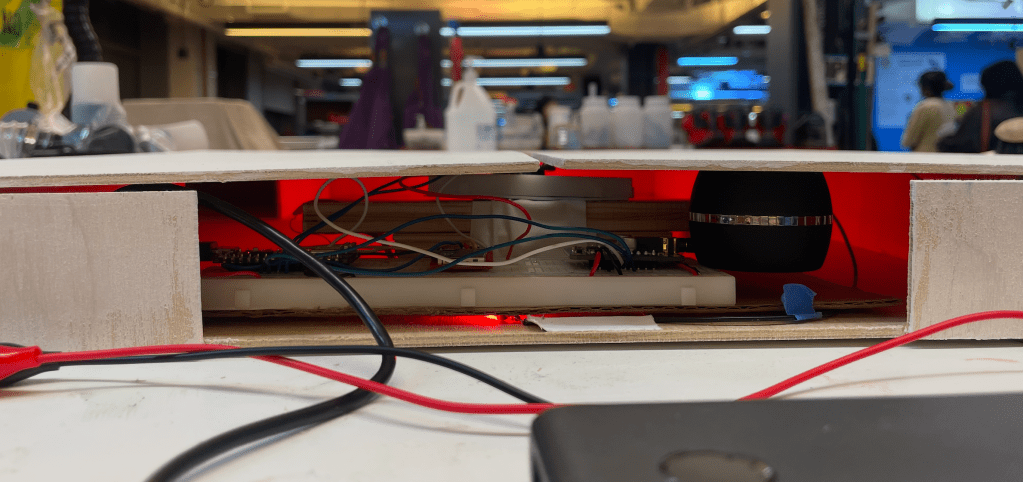
I used 1/8″ thick plywood and wood glue to make this box. Also, since I need to put in/out my breadboards freely, I made some gap underneath the box. Then I applied gesso to match the color of wall.
Before I glued the top, I fixed the red noods (flexible led) inside the box. When the light turns on, there will be a red light slightly coming through the gap in the middle.
Also, it was quite hard to make the sensor and breadboards stable when I try to push this into the box. Then, I got an advice from the Lab staff to stick my breadboards on to the cardboard so that they don’t mess around when I push them in. Additionally, I used stack of plywood to level the ToF sensor to make sure that it is right behind/between the gap.